SEARCH FREQUENTLY ASKED QUESTIONS
Start typing the name of the product and the related frequently asked questions will populate below.
Frequently Asked Questions
Yes, you can clone the printer's configuration, firmware or upload label style to a USB flash drive and specify the file name inside. Please contact the TSC Service Center for more information.
To customize the logo, please contact TSC for more information.
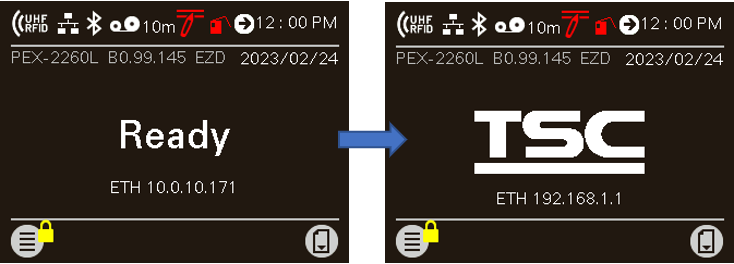
Yes, you can open the browser and enter the IP address of the printer to go to the “Internal Embedded Webpage” to manage the printer. The “Internal Embedded Webpage” is a web UI (user interface) designed for one-on-one remote printer configuration management, monitoring and troubleshooting.
If you want to print with labels that have black marks on the print side, go to Sensor > Black Mark Location and then select Print Side. After finishing the setting, follow the steps described in the User Manual to adjust the position of the top black mark sensor. Please refer to the PEX-2000 User Manual for more information.

Yes. You can easily access the media drive module by just opening the rear cover. You can choose to replace the whole module or only the belt. The replacement takes no more than 15 minutes.
Yes, users are allowed to rotate the printer's display. The display can be set to 0 degrees (standard) or 180 degrees using the printer's setup menu. To change the direction of the display, go to Menu > Advance > LCD Invert and then select Yes or No based on how you are going to use the printer.
Yes. You can establish rules using TSC Console Web so that your printer will execute what you have set up every time a condition is met. Conditions for a rule can be time-based or event-driven.
You can set your printer to take an activity daily, weekly, monthly, or at a particular date/time.
The printheads are interchangeable.
The printheads are interchangeable.
Yes, the printheads are user replaceable and will automatically detect and accept when a user has changed from a 203 to a 300 dpi or vice-versa.
Yes, TSC Console Web enables users to update printer firmware remotely.
Yes, TSC Console Web allows users to set up a reminder for printhead maintenance and the printhead mileage can be displayed on the dashboard.
Yes, the ODV-2D is available as a field kit and can be added to any 4-inch T8000 and T6000e printer. Only ODV-2D Certified Partners can purchase and install an ODV-2D field kit.
Yes, the ODV-2D can handle both 1D and 2D barcodes in any orientation, including picket fence and ladder barcodes. Some 2D barcodes may not be available at launch.
No. Please return the Alpha-30L/Alpha-40L unit to the reseller and our team of experts will make these replacements for you.
No. Please return the M4L2 unit to the depot, and our team of experts will make these replacements for you.
No. Please return the TDM unit to the reseller and our team of experts will make these replacements for you.
No. TSC Console Web must be used through either a wireless or wired network. That is to say your printer must support either Wi-Fi or Ethernet interface if you want to manage the printer using TSC Console Web.
Only the MB241 RFID printer with tear-off option supports thick RFID labels and tags (up to 1.65 mm thick).
Yes, you need a screwdriver – the printhead is retained in place by a single screw. The screw is very accessible and easily removed.
No, the printhead replacement is a simple process that requires no tools.
No tools are required.
You need a #1 Philips screwdriver to remove the printhead.
Both ports do not interfere with each other. They can work simultaneously.
Yes…the M4L2 is certified for Wi-Fi 802.11 a/b/g/n, WEP, WPA, and WPA2, as well as Bluetooth V2.1, Class 2. Please check the product brochure for complete information.
No. The MB241 RFID printer supports RFID labels and tags which are compliant with the UHF Gen2 (ISO18000-63) specifications.
No, the throughput speeds of the ODV-2D are highly dependent upon the setup and validation procedure options that are selected by the operator. In addition, label formats that have numerous barcodes with large data validation requirements will impact throughput speeds. However, the simplicity of setup, and operation of the ODV-2D provides significant advantages in the majority of applications. As a result, throughput speeds have not been an issue with initial installations. The Printronix Auto ID VAR partner is capable of evaluating your application to ensure that throughput speeds are optimized to meet your requirements.
Yes, you can use the front gap sensor to calibrate the micro label. The printer's default gap media sensor setting is on the label holder cover (rear side of the printer), with the green media sensor LED. If you want to use the front gap sensor, go to Sensor > Gap Location and then select Front. You can refer to the PEX-2000 User Manual for more information.
Yes. To install the thick media (0.9 mm - 1.2 mm), use a tool to lift up the front gap media sensor to facilitate the media installation.

The ODV-2D both verifies and validates barcodes as they are printed. The data printed on the label is validated to match the data sent from the host. The barcode is verified to comply with ISO standards.
The ODV-2D both verifies and validates barcodes as they are printed. The data printed on the label is validated to match the data sent from the host. The barcode is verified to comply with ISO standards.
To purchase a TDM printer, buyers can contact their local TSC reseller, or contact us through our website.
Please see the How-to Video.
Please contact our regional sales representatives.
- Select the printer → Function → Printer Configuration → Get
- Adjust the value of Speed and Density then press Set to finish setup.
Please refer to HERE.
The control panel printer setup wizard provides an easy-to-follow calibration process. The Settings menu allows you to select the Gap/Mark sensor to match the type of media installed. In addition, you can set the printer to do an auto Calibrate at power up or when print station has been closed. In all cases the printer will advance a few labels and calibrate the sensors so that they will detect top-of-form.
The control panel printer setup wizard provides an easy-to-follow calibration process. The Settings menu allows you to select the Gap/Mark sensor to match the type of media installed. In addition, you can set the printer to do an Auto Calibrate at power up or when the pivoting deck has opened and closed. In all cases the printer will advance a few labels and calibrate the sensors so that they will detect top-of-form.
Calibration is described in the Control Panel Printer Setup Wizard. Also, under the Settings menu you select the Gap/Mark sensor that matches the type of media installed and then select the Auto Calibrate option. In addition, you can set the printer to do an Auto Calibrate at power up and/or when the pivoting deck is opened and then closed. In all cases the printer will advance a few labels and calibrate the sensors so that they will detect TOF.
The T8000 icon-based control panel will guide you through the changes of configuration and settings of the printer. With the user-friendly step-by-step setup wizard, you can manage the printer settings easily. If you need more information, please refer to the User Manual.
The T800 has an RFID label calibration feature in the RFID menu which makes it very easy to setup the printer for different RFID labels. The calibration process feeds three labels to determine the optimal encoding position and power levels.
The MB241 RFID printer features the RFID label calibration function which makes it easy to configure the printer for both standard RFID and on-metal RFID labels. The calibration process feeds 3 to 4 labels to determine the optimal encoding position and RF power levels.
The T4000 RFID printer has an RFID label calibration feature in the RFID menu which makes it very easy to set up the printer for both standard RFID and on-metal RFID labels. The calibration process feeds 3-4 labels to determine the optimal encoding position and RF power levels.
The T6000e RFID printer has an RFID label calibration feature in the RFID menu which makes it very easy to setup the printer for both standard RFID and on-metal RFID labels. The calibration process feeds 3-4 labels to determine the optimal encoding position and RF power levels.
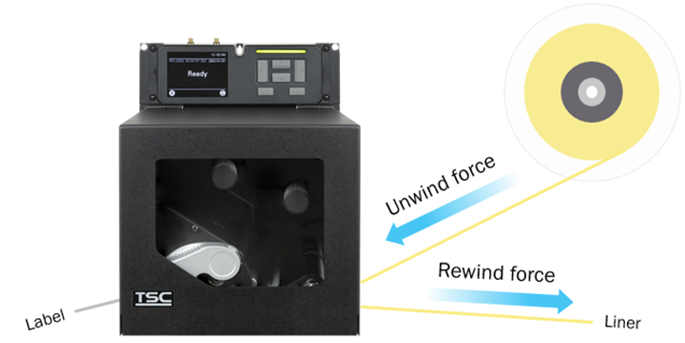
Media Unwind Force:
- In Peel Mode (with liner drawn by the peel roller):
Applicator media supply steady state tension must be uniform and not exceed 940g (2.0 lbs.) Start/Stop tension transients must not exceed 1840g (4.0 lbs). - In Tear Mode (media feed without peeling):
Media tension not exceed 400g (0.88 lb).
Media Rewind Force:
- In Peel Mode (with liner drawn by the peel roller):
Applicator media take-up pull tension must be uniform and not exceed 1840g (4.0 lbs).
It is very difficult to give the precise number of hours it will last as the usage of the printer varies based on applications. However, the Alpha-30L lasted more than 23.5 hours of printing receipts (One print every 2 minutes; 12.5% printing area; printing via Bluetooth) on a single battery charge; the Alpha-40L lasted more than 45 hours of printing receipts (One print every 2 minutes; 12.5% printing area; printing via Bluetooth) on a single battery charge.
It is very difficult to give the precise number of hours it will last as the usage of the printer varies based on applications. However, the TDM-30 lasted more than 42 hours of printing receipts on a single battery charge; the TDM-20 lasted more than 17 hours of printing receipts on a single battery charge.
For Thermal Transfer applications: printheads are warranted 12 months from shipment or 1 million linear inches (whichever comes first). For Direct Thermal applications: printheads are warranted 180 days from shipment or 1 million linear inches (whichever comes first).
For Thermal Transfer applications: printheads are warranted 12 months from shipment or 1 million linear inches (whichever comes first). For Direct Thermal applications: printheads are warranted 180 days from shipment or 1 million linear inches (whichever comes first).
For Thermal Transfer applications: printheads are warranted 12 months from shipment or 1 million linear inches (whichever comes first). For Direct Thermal applications: printheads are warranted 180 days from shipment or 1 million linear inches (whichever comes first).
Users are allowed to save up to 5 sets of different configuration for quick deployment.
Open TSC Console → Select the printer → Functions → Printer Configuration → Calibration.
- Click the checkbox to select the printer/printers.
- Click Tools → File Manager Tool to access File Manager page.
- Turn the file type into Firmware File.
- Press Browse to select firmware file.
- Press Download to update firmware.
Please set Codepage to UTF-8.
- Click the checkbox to select the printer/printers.
- Click Tools → Bitmap Font Tool.
- Select font and set the size of it
- Press Download Font to download font to the printer
- Check Tool → File Manager Tool to see is it successfully imported.
When the black mark is on the print side of the label, you can set the upper black mark sensor via the LCD menu or by referring to the SET BLINE PRINTSIDE command in the TSPL Programming Manual.
The MB241 RFID printer supports both TSC and Zebra RFID printer commands, which makes it easy to integrate the MB241 RFID printer into the existing applications.
To more closely monitor the installation of ODV-2D technology, units will only be available through our Value Added Resellers who have been ODV-2D Certified.
Yes. ODV-2D is fully integrated into the same footprint as the printer and is tied to the printer controller so data from the application can be passed to ODV-2D, the printer can overstrike and reprint a failed label without operator intervention, and the data from ODV-2D can be integrated into Print Network Enterprises reporting and monitoring capabilities.
Yes, the many advantages of 802.11ac functionality are available in the T8000 and T6000 models of printers. Typical W-Fi speeds are expected to improve 3x to 5x over older W-Fi versions.
The compatible architecture for TSC Console Web is x86_64 only and the Linux OS distribution is Ubuntu 22.04 or above.
Accessory | TH220 Series | DH220 Series | TH240 Series | DH240 Series |
802.11 a/b/g/n/ac Wi-Fi with Bluetooth 5.0 combo module | V | V | ○ | |
Bluetooth 5.0 module | V | V | ○ | |
Peel-off module | ☆ | ○ | ||
Guillotine cutter (full and partial cut) | ☆ | ○ | ||
Care label cutter (full cut) | V | N/A | V | N/A |
Linerless with tear | N/A | V | N/A | V |
Linerless with cutter (full cut) | N/A | V | N/A | V |
10mm narrow media adaptor | V | ▲ | V | ▲ |
V: available; ○: available & interchangeable for 4-inch models; ☆: available & interchangeable for 2-inch models; ▲: available & interchangeable for 2-inch and 4-inch models; N/A: not available
High Performance Productivity • Print speed up to 14ips • Fast time-to-first-print • High volume capability at 10,000 labels per day Ultimate Flexibility • Print Resolution: 203, 300 and 600 dpi to perfectly match your application • Enterprise-level Connectivity with best in industry connectivity & W-Fi security • Advanced UHF RFID with support for on-metal and standard RFID labels and tags • Printronix System Architecture supporting for nine competitor printer languages • Simplified printer installation & operation • Remote printer management using the free PrintNet Enterprise application Ultimate Reliability • Solid metal-framed construction • Operates in wide temperature range -5degC to +40degC • High MTBF at 15,000hrs (recommended label usage per day: 10,000 labels/day)
On-metal tags (sometimes called metal-mount or anti-metal tags) are RFID tags that are designed to operate on items made of metal. The physical properties of metal serve to reflect RF signals and so a standard RFID label would be completely undetectable by an RFID reader. On-metal tags are typically constructed with a thin foam insulator to provide a space between the metal surface and the RFID inlay. On-metal tags are available in several constructions and the ones used with printers are typically up to 1mm thick due to the foam insulator. They also should include a “bridge” between the individual tags to ensure smooth transport through the print station.
On-metal tags (sometimes called metal-mount or anti-metal tags) are RFID tags that are designed to operate on devices made of metal. The physical properties of metal serve to reflect RF signals and so a standard RFID label would be completely undetectable by an RFID reader. On-metal tags are typically constructed with a thin foam insulator to provide a space between the metal surface and the RFID inlay. On-metal tags are available in several constructions and the ones used with printers are typically up to 1mm thick due to the foam insulator. They also should include a “bridge” between the individual tags to ensure smooth transport through the print station.
On-metal tags (sometimes called metal-mount or anti-metal tags) are RFID tags that are designed to operate on items made of metal. The physical properties of metal serve to reflect RF signals. As a result, a standard RFID label would be completely undetectable by an RFID reader. On-metal tags are typically constructed with a thin foam insulator to provide a space between the metal surface and the RFID inlay. On-metal tags are available in several constructions and the ones used with printers are typically measuring 1 mm thick or more due to the foam insulator. They also should include a “bridge” between the individual tags to ensure smooth transport through the print station.
The RFID functions that the MB241 RFID printer currently supports are: calibration, read and write, full or partial label overstrike (based on the label length) on RFID label when encountering encoding failures, and RFID label counter for tracking good and bad labels.
Standard Interfaces are: Serial, USB host/device and Ethernet. Optional Interfaces are: Wireless 802.11 a/b/g/n/ac and Bluetooth 4.2.
Standard Interfaces: Serial, USB host/device and Ethernet. Optional Interfaces: Wireless 802.11 a/b/g/n/ac, GPIO, and parallel
Currently the supported RFID functions through TSC Console Web are: Calibration, Read, and Write.
The UI for TSC Console Web is available in English, Traditional Chinese, Simplified Chinese, German, Danish, Spanish, Finnish, French, Italian, Japanese, Korean, Dutch, Norwegian, Portuguese, and Swedish.
There is a vertical DPI adjustment function in the LCD “Advanced” menu list of the printer settings. It can be easily adjusted by enabling the “Vertical Length Adjustment” function and entering a percentage range between 90% and 115%.
The T8000 is designed to stand 24/7 operations, if properly maintained. Based on our customer feedback, the average label print volume ranges from 15,000 labels per day.
The major benefit of having a PostScript/PDF printer command language is the ability to affordably and easily replace costly laser printers.
The Alpha-30L/40L has a 2 Year Parts (excluding print head and platen roller) and Labor (Return to Factory) standard manufacturer warranty. You can purchase the Service Option warranty that adds up to three years to your printer's original coverage within 30 days of your initial barcode printer purchase.
The M4L2 has a 1 Year Parts and Labor (Return to Factory) standard manufacturer warranty. Additional 1 Year or 2 Year Service Maintenance agreements are available for purchase.
The TDM has a 2 Year Parts (excluding print head and platen roller) and Labor (Return to Factory) standard manufacturer warranty. You can purchase the Service Option warranty that adds up to three years to your printer's original coverage within 30 days of your initial barcode printer purchase.
The MB241 RFID comes standard with a 1-year factory warranty. Extended warranty packages are available. Please contact your TSC Territory Account Manager for more information.
There are two host interface options: W-Fi 802.11a/b/g/n/ac and Bluetooth 5.0, and two media handling options: tear and cutter. The RFID printer comes with the standard Tear feature, or an optional Cutter. All options are available as a factory and dealer option. The field installation requires a trained technician.
The Alpha-30L/40L supports TSPL-EZC (EPL2, ZPL2, CPCL), or ESC-POS emulation printer languages.
The M4L2 supports both ZGL II and CPCL printer languages.
The TDM series supports TSPL-EZ (EPL2 and ZPL emulations) ESC-POS, CPCL emulation printer languages.
Unlike most other RFID printers on the market today, the MB241 RFID with tear-off option is designed to support a variety of on-metal tags up to 1.65 mm thick.
The MB241 RFID printer supports a wide range of standard UHF (Ultra High Frequency) RFID labels and On-Metal RFID tags. We can provide you with a list of validated labels and tags. This list is constantly undated as new RFID inlays and tags become available on the market and are validated by TSC.
After you print 1km or whenever there is any glue residue or dust on the media route. Use the linerless cleaning kit to clean following parts:
- Cutter blade (For Linerless cutter kit option)
- Print head
- Linerless platen roller
- Media path
- Media sensors
For more information, please refer to the How-to Video.
The management commands are transmitted/received through port 3007.
- Please make sure the Ethernet cable and the printer are well connected and lights are flashing.
- Way 1: Restart the printer again.
- Way 2: Load the ribbon rewind spindle correctly, and make sure it’s in correct direction.
- Check if the printer is powered on.
- Check if the printer, port, and driver are all correct.
No, the ODV-2D comes either pre-installed at the factory or included in the printer carton for installation at the site. We still require reseller certification to enhance the ability of the reseller to provide assistance with any calibration or validation questions.
- Seleccione la impresora → Función → Configuración de la impresora → Obtener
- Ajuste el valor de Velocidad y Densidad y, a continuación, pulse Establecer para finalizar la configuración.
Seleccione la impresora → Funciones → Configuración de la impresora → Bluetooth → Obtener

